Years before I learned how to knit my sister attempted to teach me how to crochet.  I couldn’t even get the chain stitch down.  It was just so HARD!  Feeling pretty confident after my lace scarf, I decided I was going to teach myself how to crochet.  I went and purchased three hooks, watched a video and hunkered down to learn a new craft.  It didn’t start out so well.  Although I got the chain stitch down pretty quickly, my chain was so tight I couldn’t get my needle in to start my first row of sc (single crochet).  So I practiced.  And practiced.  And ended up with this:

Yeah, not so pretty.  That was Friday evening.  I put it down and counted stitches to put myself to sleep.  Saturday I woke up and went at it again.  I tried a different yarn that made it easier to see my stitches, consciously made my chain looser, and after practicing all day, I had it down.  I went to my crochet book, and practiced on some scrap yarn.  By the end of the weekend, I had mastered the single crochet, double crochet, half double crochet, and triple crochet.  Here’s my practice scrap:

I wondered why the edges weren’t so pretty and I figured out that what the book didn’t tell me was that when you turn and start to knit a half-double crochet row, you chain two to begin.  And with a double-crochet row, you chain 2 or 3.  DUH!

Now that I have the stitches down, it’s time to start a real project!   Coming soon…

So if you know me, you know I love ALL things girly!  I wanted a quick and easy project, so I picked up a skein of Flamenco Trendsetter Yarn in color Merlot.  It only took me three hours and I love it!  SO girly!!!

Here’s a close-up photo:

Tahki Rosa Scarf

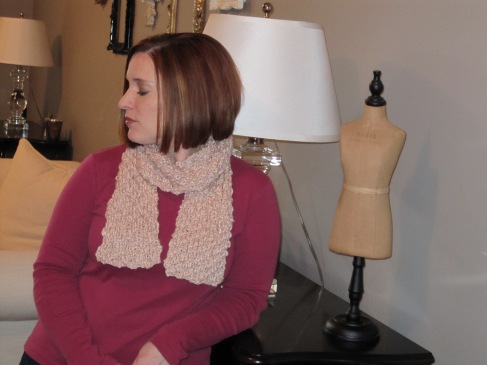
Per usual, I went to the yarn store on Saturday morning and my hand landed on the softest yarn I’ve ever felt and it was a blush color, my favorite!  It was the Rosa yarn by Tahki, and is a gorgeous texture.  I bought three balls in color sand (although this yarn comes in a color blush, it was way too pink, and the sand looked like blush to me), and then it sat in my yarn bin for a few weeks.  After the lace scarf, I felt like I emotionally needed to knit a scarf that I didn’t have to think about the pattern.  I immediately went to this yarn and thought of what stitch I should use to showcase the texture. I usually don’t gravitate towards seed stitch, since it takes so much longer since you have to throw your yarn between each stitch, but it really did look better than anything else I tried.  So seed stitch it was!

Because I don’t like to think about whether to start the row with a knit or a purl, I cast on an odd number of stitches, so I was starting each row with a knit stitch and ending with a purl stitch.  Here’s how it turned out:

Image

It feels scrumptdidillyumptious!  Now if this 100 degree heat will leave the Midwest, I’ll actually get to wear it!

Lace Scarf

I’ve been knitting since 2006 but have always been scared of anything lace and anything mohair.  I was at the yarn store one day and felt up for the challenge, and here is the result:

I knit everything on metal circular needles because it’s easier when you set your work down and the yarn doesn’t get stuck like it does on bamboo needles.  It took me a little while to get used to knitting a lace pattern, as I’m a really tight knitter and I had to consciously loosen my stitches.  Once I got the hang of it, I was able to knit this up pretty quickly.  I’m not going to lie and say I didn’t have to start all over more than once.  With yarn-overs, if you drop a stitch it’s hard to pick it back up (at least for me, this being my first time doing a yarn-over in a pattern).  What I ended up doing was using a darning needle and weaving a piece of thicker yarn through after a row 1 every 8th row.  Then when I goofed, I only had to rip at the most 8 rows instead of the whole project!

Here’s the how to:

Materials:

2 balls Luna yarn from the S. Charles Collezione

Color Champagne Mist

Since 9 US (5.5mm) needles

Note: Knit with two strands held together throughout.

CO 43 stitches very loosely

Pattern:

Row 1: Purl

Row 2: K2 tog, yo, *k3, yo, k1 (sl1, k2tog, psso), k1, yo, k3, yo (sl1, k2tog, psso), yo.  Repeat from * to last 13 stitches, then k3, yo, k1, (sl 1, k2tog, psso), k1, yo, k3, yo, (sl 1, k1, psso)

Row 3: Purl

Row 4: K2 tog, yo, *k4, yo, (sl 1, k2tog, psso), yo, Repeat from * to last 6 sts, then k4, yo, (sl1, k1, psso)

Repeat these four rows until scarf measures desired length.  Bind off loosely with purl stitches.  Mist to block.  Wear and impress people with your expensive-looking scarf that YOU made!

Happy knitting!!!

Here’s a close-up:

After nudging from family and friends, I am starting a blog!  If any of the below apply to you, then you’re definitely going to want to follow my blog:

  • You love all things girly!
  • You love all things crafty!
  • You enjoy shopping for, well, pretty much anything!  Especially beauty products and vintage furnishings!
  • You love to curl up on the couch and read a good book!